Supermicro X10DRH-I User Manual Page 28
- Page / 131
- Table of contents
- TROUBLESHOOTING
- BOOKMARKS
- X10DRH-C 1
- X10DRH-CT 1
- X10DRH-i 1
- X10DRH-iT 1
- About This Motherboard 3
- Manual Organization 3
- Contacting Supermicro 5
- Table of Contents 6
- Chapter 1 9
- Overview 9
- X10DRH-C/i(T) 11
- X10DRH-C/i (T) 18
- 1-3 Special Features 20
- 1-5 ACPI Features 21
- 1-6 Power Supply 21
- Management Engine (ME) 22
- Chapter 2 23
- Installation 23
- Product Disposal 25
- Precautions 26
- Unpacking 26
- •Phillips screwdriver 27
- •Panhead screws (9 pieces) 27
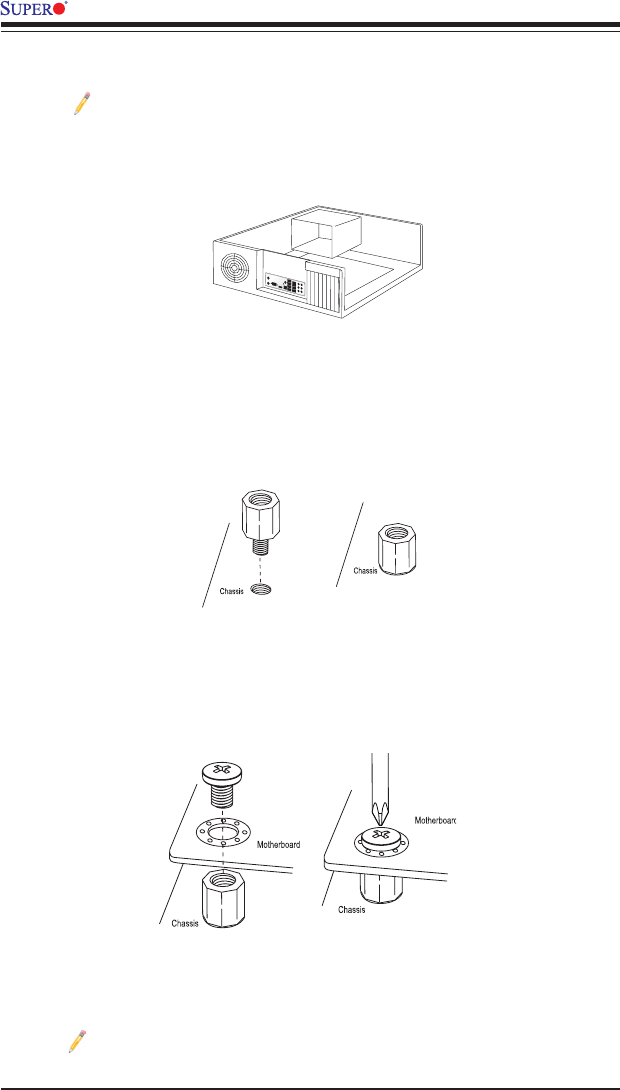
- Installing the Motherboard 28
- OPEN 1st 29
- Direction of the 34
- CAUTION 35
- Removing Memory Modules 35
- Chapter 2: Installation 37
- L3-000099-00 Cable 39
- The Reverse Side 39
- 1. GLAN1 (X10DRH-C/i) 43
- 10GLAN1 (X10DRH-CT/iT) 43
- 2. GLAN2 (X10DRH-C/i) 43
- 10GLAN2 (X10DRH-CT/iT) 43
- 3. IPMI LAN 43
- Front Control Panel 45
- 2-8 Connecting Cables 50
- LAN CTRL 50
- 2-9 Jumper Settings 56
- A. VGA Enabled 58
- B. BMC Enabled 58
- A. SAS Enabled 60
- 2-10 Onboard LED Indicators 61
- A. PWR LED 62
- B. BMC LED 62
- A. SAS Activity 63
- B. SAS Fault 63
- A. SAS Heart 64
- 2-11 SATA/SAS Connections 65
- A. SAS0-3 66
- B. SAS4-7 66
- Chapter 3 67
- Troubleshooting 67
- No Video 68
- System Boot Failure 68
- Memory Errors 69
- •System conguration 71
- Proper Battery Disposal 72
- Battery Removal 72
- Chapter 4 75
- 4-2 Main Setup 76
- Boot Feature 78
- Power Conguration 79
- CPU Conguration 80
- (Conguration) 83
- Chipset Conguration 85
- North Bridge 85
- IIO Conguration 85
- IIO0 Conguration 85
- •PCI-E Port Link Status 86
- •PCI-E Port Link Max 86
- •PCI-E Port Link Speed 86
- IIO1 Conguration 89
- QPI General Conguration 93
- QPI Status 93
- Memory Conguration 94
- •P1 DIMMA1 95
- •P2 DIMME1 95
- •USB Module Version 96
- •USB Devices 96
- •Software Preserve 98
- PCIe/PCI/PnP Conguration 103
- Super IO Conguration 105
- Enabling TPM in the BIOS 111
- iSCSI Conguration 113
- Add an Attempt 113
- Delete Attempts 113
- Change Attempt Order 113
- ACPI Settings 113
- 4-4 Event Logs 114
- View SMBIOS Event Log 115
- 4-5 IPMI 116
- •IPMI LAN Selection 117
- •IPMI Network Link Status 117
- 4-6 Security Settings 118
- 4-7 Boot Settings 119
- •Boot Option #1 120
- •UEFI Boot Option #1 120
- Appendix A 123
- BIOS POST Error Beep Codes 123
- Appendix B 125
- B-2 Installing SuperDoctor5 126
- Appendix C 127
Related products and manuals for Server/workstation motherboards Supermicro X10DRH-I
 (117 pages)
© 2020, manymanuals.com. All rights reserved. | 0.480 s |
 Manymanuals.com
 Manymanuals.de
 Manymanuals.fr
 Manymanuals.it
 Manymanuals.pl
 Manymanuals.cz
 Manymanuals.es
 Manymanuals-pt.com
Comments to this Manuals